We Are Creative Design Agency

Lorem ipsum dolor sit amet, consectetur adipisicing elit. Illum, fuga, consectetur sequi consequuntur nisi placeat ullam maiores perferendis. Quod, nihil reiciendis saepe optio libero minus et beatae ipsam reprehenderit sequi.

Find Out More Purchase Theme

Our Services

Lovely Design

Lorem ipsum dolor sit amet, consectetur adipiscing elit. Praesent feugiat tellus eget libero pretium, sollicitudin feugiat libero.

Read More

Great Concept

Lorem ipsum dolor sit amet, consectetur adipiscing elit. Praesent feugiat tellus eget libero pretium, sollicitudin feugiat libero.

Read More

Development

Lorem ipsum dolor sit amet, consectetur adipiscing elit. Praesent feugiat tellus eget libero pretium, sollicitudin feugiat libero.

Read More

User Friendly

Lorem ipsum dolor sit amet, consectetur adipiscing elit. Praesent feugiat tellus eget libero pretium, sollicitudin feugiat libero.

Read More

Recent Work

Sunday, 2 April 2017

Copying all the posts from one blog to another

Copying all the posts from one blog to another

Follow these steps to copy all posts from one blog to another

1  Log in to Blogger.

2  Go to the export tab from the  Settings / Other tab.

3  Click on Export Blog.

Export-blog window on the old Blogger interface:
the new interface looks a little different, but has the same links

3a  If you are using the new interface, click Download Blog on the confirmation message window:


4  Your computer will download a file.   For Windows users, it will probably be put in the My Documents / Downloads file.  Or you system may use another place, or it may ask you where to put it.   Whatever happens, you will need to know where this file is saved to.

5  Open the blog that you want to move the posts to
(You may need to log out and in again, or perhaps just switch to different browser or tab)

Delete (using Posting / Edit Posts) any Posts that are already there, but which you don't want in the refreshed blog.

6  Go to Settings > Other and click Import Blog.  When the box opens, choose the exported file that you made earlier, and enter the security-text.
Import file selection screen in the new interface:
the old version of Blogger is very similar.

7  Choose whether or not to automatically publish all imported posts.  
Only tick the box if you DO want the posts automatically imported.   If you don't tick it, the posts will be loaded, but with have status of Draft, so won't be visible by readers until you publish them.

8  Click Import Blog.

Check that the import worked successfully, by looking at the blog, and also at the list of posts under Edit Posts:  are the right number of posts there, do they have the right labels etc.


Results
IMG redCowRoadworks4586All the posts from the source blog will be copied to the destination blog.

Many of the post characteristics will be the same as in the original blog.  This includes:
  • title
  • post contents
  • published-date and time
  • label(s)
  • post-author.


Any comments from the source blog will also be copied over - sometimes it takes a few hours for the links for them to be re-establshed properly.

The URL for each post will be based on the URL of the blog you have imported them into and the publication-date that the posts had in the source blog - for example:
www.YourNewBlogName.blogspot.com /2009/05/name-based-on-post-title.html

Any internal links in the blog will still point to the post in the old blog
For example this link points to a popular article in Blogger-HAT.  
If I export-and-imported this post into a new blog, the link would still point to the same place, ie the post in Blogger-HAT - not to the post in the new blog.

Any pictures, videos etc in the old blog will still be in the same place that they were in (Picasa-web-albums, YouTube, Google Videos etc).

If you have imported more than the number of posts that Blogger allows per day (currently 50 I think) then to make any more posts today you will need to complete the captcha-test (ie entering the letters in the funny-shaped word).   This will go away approximately 24 hours after you last enter more that the maximum-posts-per-day.


Importing to the same blog

If you try to import posts into the same blog that you exported them from, Blogger will not import any posts, and give you an error message.

If you do want to do this (eg to create a duplicate set of posts), then do the export, change some small detail of the original posts title or date/time, and then do the import.

Friday, 10 March 2017

How to add the contact form to Blogger

How to add the contact form to Blogger

How to add the contact form to Blogger

Login to your Blogger Dashboard and Navigate to the Layout Page
Click on the Add a Gadget Link and select More from the left Menu. You can add the add the brand new contact form the right side list
add-contact-form-in-blogger
You can set an appropriate title for the Gadget and Save it.
configure-blogger-contact-form

Once it’s done, you should see the slick and clean Contact Form widget added to your blog’s sidebar.The contact form has the below input fields
  1. Name – Name of the reader who is sending you a message
  2. Email – Email address of the reader who is sending you a message
  3. Message – The message which the reader wants to send to you.
  4. Below is the screenshot of the Contact Form Widget added to one of my test blogs.
    blogger-contact-form
    The Contact form has validations in place and error messages will be displayed in case the user misses out the email address or message. Though the form doesn’t have any captcha validation,it is less likely to be attacked by spam bots as the send button is triggered by JavaScript.
When the reader sends you a message via the contact form, you will receive it straight in your inbox. Copies of this message will be sent to each admin user of the blog. Below screenshot will give you an idea of how the message will look like. contact-form-email-received
You can directly reply back to to the sender from you email. If you want to move the Contact Form to a separate page, then checkout the tutorial on creating a separate contact page for blogger.
You can change the look and feel of the contact form by altering the CSS styles. We will try to publish another tutorial which will help you in customizing the contact form. You can see a slightly customized version of the contact form widget on our Contact Page.

How to take your Blogger Contact Form to a separate Page

How to take your Blogger Contact Form to a separate Page

Blogger Contact Form to a separate Page

Follow the below steps to move the Contact Form to a separate page. If you would like to see a demo, you can check out my Contact page.
  1. First, add the contact form to your blog sidebar and test it. Make sure that you are receiving emails in your inbox when you click the send button.(This is an optional step)
  2. Now remove the Contact Form gadget from your sidebar. You can do that on the layout page.
    remove-contact-form-gadget-from-sidebar
  3. Now find out the unique blogID of your blog. When can find this blogID on the URL bar of your browser when you are on any page on your blog’s dashboard. This blogID is required to generate the code for the new Contact Form page. The below screenshot explains how you can find out the blogId. Find this number and note it down. This number will be needed to generate code for the contact form.
    find-blogger-blogID
  4. Now create a new page in your blog
    create-new-page-in-blogger Copy and edit the below code snippet. Editing the blogId number is mandatory(Use the number which you noted down in step 2)
     
     
    <script>
    var blogId = '8694494030520005341';//this number should be mandatorily edited.
    //The below message 5 Strings can also be edited
    var contactFormMessageSendingMsg ='Sending...';
    var contactFormMessageSentMsg = 'Your message has been sent.';
    var contactFormMessageNotSentMsg = 'Message could not be sent. Please try again later.';
    var contactFormEmptyMessageMsg ='Message field cannot be empty.';
    var contactFormInvalidEmailMsg = 'A valid email is required.'
    
    var widgetLoaded=false;
    function sendEmailMsg() {
    if(widgetLoaded== false) {
    _WidgetManager._RegisterWidget('_ContactFormView', new _WidgetInfo('ContactForm1', 'sidebar', null, document.getElementById('ContactForm1'), {'contactFormMessageSendingMsg': contactFormMessageSendingMsg , 'contactFormMessageSentMsg': contactFormMessageSentMsg , 'contactFormMessageNotSentMsg': contactFormMessageNotSentMsg , 'contactFormInvalidEmailMsg': contactFormInvalidEmailMsg , 'contactFormEmptyMessageMsg': contactFormEmptyMessageMsg , 'title': 'Contact Form', 'blogId': blogId, 'contactFormNameMsg': 'Name', 'contactFormEmailMsg': 'Email', 'contactFormMessageMsg': 'Message', 'contactFormSendMsg': 'Send', 'submitUrl': 'https://www.blogger.com/contact-form.do'}, 'displayModeFull'));
    widgetLoaded=true;
    document.getElementById('ContactForm1_contact-form-submit').click();
    }
    return true;
    }
    </script>
    <form name='contact-form'>
    <div>Your Name : </div>
    <input class='contact-form-name' id='ContactForm1_contact-form-name' name='name' size='30' type='text' value=''/>
    <div>Your Email: <em>(required)</em></div>
    <input class='contact-form-email' id='ContactForm1_contact-form-email' name='email' size='30' type='text' value=''/>
    <div>Your Message: <em>(required)</em></div>
    <textarea class='contact-form-email-message' id='ContactForm1_contact-form-email-message' name='email-message' rows='5'></textarea>
    <p></p>
    <input class='contact-form-button contact-form-button-submit' id='ContactForm1_contact-form-submit' type='button' value='Send' onclick="sendEmailMsg()"/>
    <div style='text-align: center; max-width: 450px; width: 100%'>
    <p class='contact-form-error-message' id='ContactForm1_contact-form-error-message'></p>
    <p class='contact-form-success-message' id='ContactForm1_contact-form-success-message'></p>
    </div>
    </form>
     
     
    While creating the Page, you have to switch to the HTML mode as shown in the image below. Then paste the above code into the post editor(after proper editing), disable the comments and publish your page.
    blogger-comment-form-on-separate-page
  5. Once the page is published, go to this new page fill out the contact form, click on the send button and verify that it sends out the email to all the Blog admins.

Sunday, 5 March 2017

Jehovah By Makuo Israel

Jehovah By Makuo Israel


Verse 1:
How can I describe you
Situations bow below you
The works of your hands amaze me
Darkness gives way before you
The sun, moon, and stars
The hills, sea, and mountains
Show forth your splendor
The leaves of the tree
Applaud your greatness
The bird of the air
Declare
Chorus:
You are the one who was and is to come
Alpha and Omega
You are Jehovah, You are Jehovah
You are the one who was and is to come
Alpha and Omega
You are Jehovah, You are Jehovah
Repeat Verse 1
Repeat Chorus
oh oh oh
No one else like you
oh oh oh
None can do the things you do
oh oh oh
No one else like you
You are Jehovah, Jehovah
oh oh oh
You make the blind the see
oh oh oh
You make the lame to walk
oh oh oh
No one else like you
You are Jehovah, Jehovah
You are
oh oh oh
The are the one who was and is to come
You make the blind the see
You make the lame to walk
Who is like you o Lord
oh oh oh

Ezem By Enkay

Ezem By Enkay


Ezem (3x) na di ndu (My king is everlasting)
Onye nwe anyi ezitewo ndi muozi ya ka biakutem (For he has given his angels charge over me)
Onodu’m n’emetuya n’obi (Because everything that concerns me touches his heart)
Ezem (3x) na di ndu (My king is everlasting)
Adilips in chorus
Oji oku eri aja ( He that consumes sacrifices with fire)
Oku n’erere (Consuming fire)
Oku n’aza ekpere (The God that answers by fire)
Agiga na to agbu (He that sets the captives free)
Captain of the host of heaven
My shield and buckler
Enwerem enyi (I have a friend)
Nke na egbo nkpam nile (That meets all my my needs)
Ulo’m di anya karia kpakoando (whose home is beyond the moon and stars)
Mara na nka bu oke ihe omere ( Everything he has done for me)
Nke m ji na eti Halleluyah (makes me shout Hallelujah)
Adlips in last Chorus

King of kings
Lion of the tribe of Judah
You are seated in heaven and earth is your footstool
I bow before your throne
I worship at your feet
Eze
Ogbajiri igwe kpo ya nku (He that breaks iron like wood)
Akpoaza mee (My prayer answering God)
You are worthy Jesus
Ezem na adi ndu (My everlasting King).

To Thee We Come By Funmi Sax Olujoshua

To Thee We Come By Funmi Sax Olujoshua


To thee we come
Great jehovah
Our awesome God we praise you name
May every soul that worships now
Be blessed beyond comprehension
Chorus
Our awesome God
Ancient of Days
Arise now Lord receive your praise
May every tongue that worships you
Return to give testimony

We Bring The Sacrifice Of Praise lyrics by Kirk Dearman

We Bring The Sacrifice Of Praise lyrics by Kirk Dearman

 We bring the sacrifice of praise
Into the house of the Lord.
We bring the sacrifice of praise
Into the house of the Lord.
And we offer up to You
The sacrifices of thanksgiving;
And we offer up to You
The sacrifices of joy.

How I Move/Mobilize/Changed my Wordpress Site To A New Domain

How I Move/Mobilize/Changed my Wordpress Site To A New Domain

if you are moving WordPress site to new domain ( from www.oldsite.com to www.newsite.com) and to another host (eg from domainking.ng to garanntor.ng), this tutorial will help you provided you've used softaculous to back up the site files and database.

First thing you have to do is to ensure that you create a new cPanel account on the new host with the same username used for the cPanel account on the old host. You can do this easily via WHM if you are subscribed to reseller web hosting. Else, you can send the username to your host and insist they use it when setting up your account.

Thereafter, sign in to your cPanel, navigate to "File Manager" and create a softaculous backup directory.

Next step is to upload the softaculous backup file you downloaded from your old host to the newly created softaculous folder/directory.

Once the upload completes, navigate to "Softaculous apps installer" section in cPanel and click on "WordPress".

Click on the "backups and restore" icon.  You should see the upload softaculous back up file right there.


Select both options

restore wordpress installation with softaculous in cpanel


Click "restore installation" and chill till the process completes.

Once completed, go back to your cPanel, navigate to "databases" section and click on "PhpMyAdmin" icon.

cpanel phpmyadmin


Once in phpMyAdmin, click on the site WordPress database and click on the table "wp_options". Find the options siteurl and home and change their values to the new domain name.

edit wordpress database


That's all.

Sign in to the WordPress admin area to ensure everything is OK.  Also check your theme settings and update settings (eg logo URL) that contain the old URL.

Tuesday, 21 February 2017

Google Release New Lastest Chat App ''Allo''

Google Release New Lastest Chat App ''Allo''

Google Releases New Chat App ''Allo'' And Its Clever

Google has launched a smart messaging app called Allo that it hopes will rival WhatsApp, Facebook's Messenger and Apple's iMessage, the big difference in this chat app is base on its "smart" abilities: it can reply to messages for you and has an in-app assistant called "@google" that can search the internet, play videos and offer restaurant suggestions. 
Google Releases New Chat App ''Allo'' And Its Clever
Allo can help cut down on typing on small screens by suggesting replies based on context. If a friend asks how you're doing, you can tap "Good tnx." Allo preserves chatting shortcuts such as "u'' for "you." Apple offers something similar on its smartwatch, but not phones or tablets. Allo will also analyze photos to suggest replies such as "beautiful smile" or "the skyline looks great!" — at least for photos with smiles or skylines. Remember that this is software, so its suggestions won't always make sense.
Google Releases New Chat App ''Allo'' And Its Clever
  PERSONAL ASSISTANT
When you're chatting with someone, you're often making plans. Google Assistant can retrieve information on nearby restaurants, movie times and even the weather. Everyone in the chat will see the Assistant's replies and can weigh in on the choices.

In some cases, Google Assistant will even anticipate your needs, such as when someone's asking about getting sushi. An oval bubble appears with an offer to retrieve nearby sushi restaurants. After choosing one, you can tap for opening hours, directions or the menu.

Reservations aren't available yet, though Google is considering third-party integrations such as OpenTable for dinner and Airbnb for accommodations. Apple's Messages doesn't invoke the Siri virtual assistant the same way, but it already offers integration with third-party apps so that you can make plans (and reservations) while chatting.

Beyond planning, Google Assistant can give you the latest news and sports scores, translate phrases or do math calculations. Asking for directions will bring up Google Maps. 

Plain text is boring, so Allo features a slider that can make your messages and emojis larger or smaller.

Allo will work for iPhones and Android phones, but not tablets.

The new Allo app promises to be 'smart', and am guessing this might be the smartest chat app right now.
Google Releases New Chat App ''Allo'' And Its Clever

How to Index {Submit} your Blogger Sitemap to Google

How to Index {Submit} your Blogger Sitemap to Google

What are Sitemaps?
Sitemaps are text files containing a list of all web pages that exist on your website and are accessible to crawlers and users. These helps visitors and search engine bots to find pages on website. Sitemaps are a way to help Google indexing pages on your site which otherwise might not be discovered.

If your blog is hosted on blogspot.com (or if you are using a self-hosted version of Blogger with a custom domain) you will be surprised to find out that the default sitemap file, contains only the 26 most recent pages of your blog which in normal case should contain all URLs of a website.
Many webmaster pretend to teach others how to drive traffic to blogs or websites yet leaving out the most important factors like sitemaps. There are still other websites who keep on providing the old methods of generating a sitemap for blogger which are not any effective.

How to add a complete Sitemap for your Blogger Blog

Step 1: If you haven't done this already, sign-in to your Google Webmasters account and add your blog. For details, check this tutorial on how to add a blog to Google.

Step 2: Once your blog is added to Google, go to Webmaster Dashboard  and click on your site address

Step 3:  On the left panel choose Crawl Sitemaps - then click on the Add/Test Sitemapbutton.

Add each of the following codes:

 /atom.xml?redirect=false&start-index=1&max-results=500
/atom.xml?redirect=false&start-index=501&max-results=500
/atom.xml?redirect=false&start-index=1001&max-results=500

If your blog have lots of pages, add the sitemaps below:

 atom.xml?redirect=false&start-index=1501&max-results=500atom.xml?redirect=false&start-index=2001&max-results=500
atom.xml?redirect=false&start-index=2501&max-results=500
atom.xml?redirect=false&start-index=3001&max-results=500

how to Setup adsense page-level ads in blogspot

how to Setup adsense page-level ads in blogspot

Recently, page-level ads were made available for blogspot bloggers and webmasters which means that you can now display AdSense Ads right on your mobile templates. You can now monetize your efforts on the templates as you do with mobile apps thanks to the Google Admob Ads

how to add adsense page-level ads in blogspot

Why Choose AdSense Page-level ads?

There are a number of reasons why you choose page-level ads from AdSense to bolster your revenue stream.

- Increase Revenues
- Provide Better User Experience
- Two New Formats
- Doesn't Count Against 3 Ad Limit
- Optimized and Responsive to Mobile Needs

Page-level Ad Formats

Today, the two types of page-level ads available include Anchors which are ads places at the bottom of the screen and Vignettes which are full screen ads that work similar to Admob's Interstitial adverts.
Vignettes tend to be more effective for mobile advertising.

How to Setup Page-Level Ads in Blogspot Blogs

The good news is that you can install these ads from AdSense fairly quickly and easily thanks to the process which guides you through.

1. Log into your AdSense Account
2. Click on this link
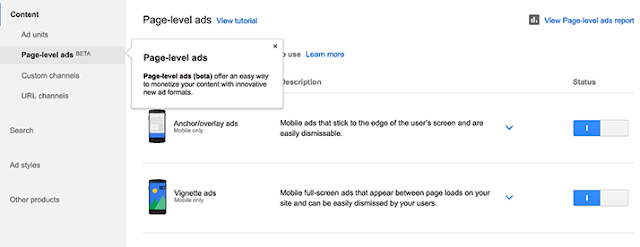
3. Click the two toggle buttons to switch on "Anchor/overlay ads" and "Vignette ads"

enable adsense page-level ads in blogger

4. Scroll down and click the "Get Code" button

enable adsense page-level ads in blogger

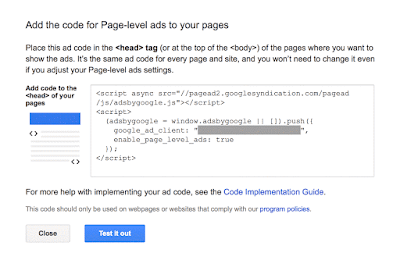
5. Copy the code

google adsense page-level ads code

6. Go to Blogger, then Template and Backup your Template
7. Click the 'Edit HTML' button and search for </head> tag
8. Paste the page-level ad code above the </head> tag

Note: You will also need to replace the attribute async with async="async" in order to help complete the process, otherwise Blogger will give you an error message. Once you have completed the process, all you need to do is save it to your template.

Test Page-level ads in your Blogger template

After installation, get out your mobile device so you can test the AdSense page-level ads and see if they are working correctly. You will need to be a visitor to your site in order to check out the ads.

- Type #googleads at the end of the URL so you can start to access them
- Select the ad format from the tabbed box that will appear above the body of the blog
- Check out the ads

You will get to see the ads in action before the public does so that you can tell if they are working fine. If you are impressed with what you see, then it is ready to go. However, if you see something that you want to change or if the ads are not present you’ll need to start over again.

The Effectiveness of Page-level ads

Since October, 2015 when these ads were first rolled out the effectiveness that they have demonstrated is considerable. Today, the ads have been used in countries all over the world and they continue to impress. For those who have already used these mobile ads on WordPress or other blogger blogs you can see just how effective they have been in terms of reaching all of your visitors. In addition, the effect on your revenue may be considerable depending on the popularity of your blog.

In the end AdSense page-level ads are remarkably effective for mobile use and will help you build a stronger income base for your blog.

Sunday, 19 February 2017

Joe Praize - Mighty God [ + Lyrics ]

Joe Praize - Mighty God [ + Lyrics ]


 Joe Praize is one of the gospel musician in Nigeria that you will always want to listen to. His music is always spirit filled. Might God is a song that will definitely move you closer to God and His wonders. …


Oh Lord, my God, Jesus

I’ll speak of you Glory,
I will show forth your beauty
If I dance it wont be enough,
If I shout it wont be enough (Repeat)

For you are the great and mighty King
You rule in every nation
On Christ the solid rock,
You are worthy to be praised
You are Alpha and Omega, I worship you today
In you I put my trust, You name I will extol

Heaven speaks of your glory
And the earth of your beauty
Your love is new every morning
And your faithfulness is ever sure (Repeat)

For you are the great and mighty God
So worthy to be praised
Your beautiful for all situation
You are the joy of the whole world (Repeat)

Yelele, Uyingwele [You are Holy],
Siyakudumisa [I worship You]
Hallelujah, Hallelujah

For you are the great and mighty God
So worthy to be praised
Your beautiful for all situation
You are the joy of the whole world (Repeat)

Jesus, Jesus my Lord, You are the joy of the world…

Adding a form to Blogger

Adding a form to Blogger

You Can Get Your Blogger Code from JotForm
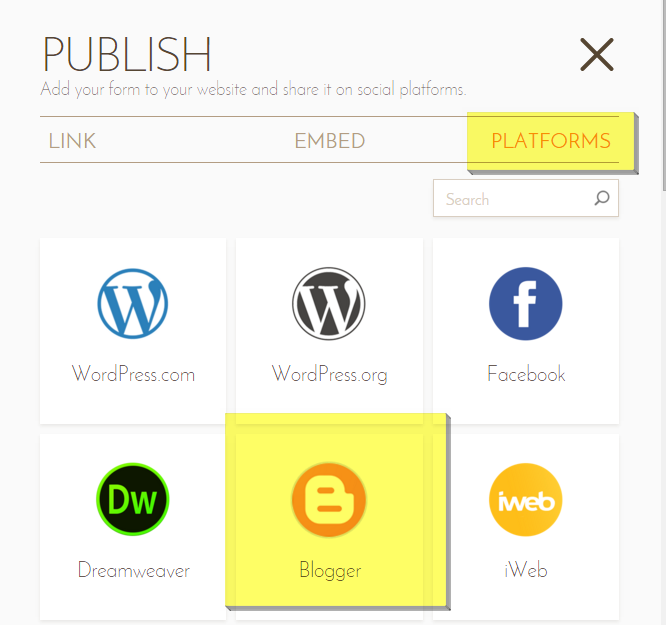
1. Click the "Publish" button in the form builder
2. Click the "Platform" tab in the publish wizard
3. Find and click the "Blogger" option

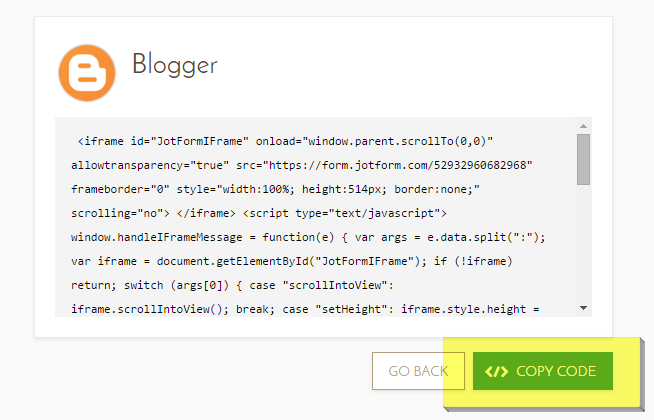
4. Click the "Copy Code" button to copy the form embed codes


Go To Blogger & Add Your Form
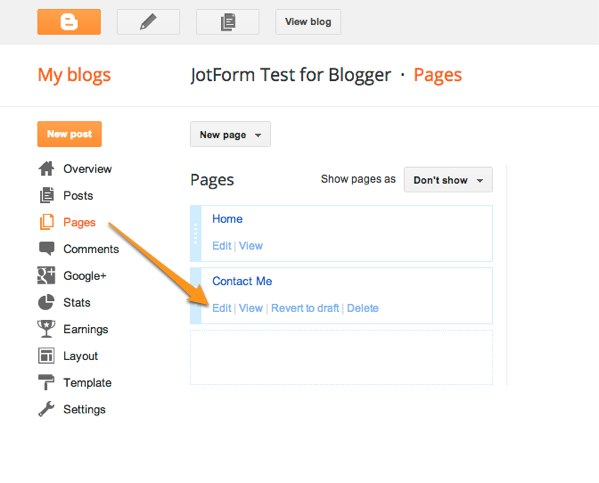
1. Go to a Blogger, select the pages menu & click edit on the desired page 
go to blogger

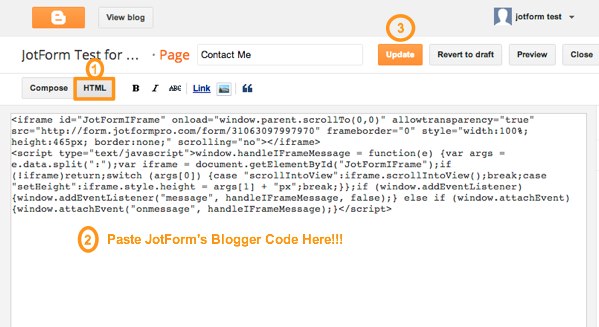
2. Switch to the HTML editor, paste your code, & click update 
adding form to blogger


3. View your form in your page just to make sure 
view form in blogger

 You're done that easy. How'd you do? Was it easy for you to add your form to Blogger? Please share your thoughts in the comments section below.

7 Basic On Page SEO Tips For Blogspot Blogs

7 Basic On Page SEO Tips For Blogspot Blogs

7 Basic On Page SEO Tips For Blogspot Blogs

Search Engine Optimization (SEO) is the most important thing to learn for best blogging experience. Without proper blog optimization, we can’t even dream to get impressive traffic from search engines. From past few days, I am getting too much request of newbie bloggers to share some On-Page SEO Tips. That’s why today I plan to mention all those On Page SEO tips which I already shared on my blog in my earlier posts. I’m sorry if you have read those posts before, but I need to grab attention of newbie bloggers who just start learning SEO for their blog. All those tips are must to know by every blogger.

So, let’s take a look on best On-page SEO Tips for Blogspot Blogs and if you have read them before then don’t ignore this post. May be you learn something new which you missed before because of any reason.
blogger on page seo tips

On Page Search Engine Optimization Tips For Blogspot

Below are the tips and tricks that will be beneficial for you to optimize your blog for Google and other search engines. Read them carefully and apply all of them on your blog to make your blog lovable and trust worthy for search engines.

#1 Custom Robots Header Tags

There are some settings for bloggers that they can personally do for their blogs to make their blogs more SEO friendly. Custom Robots Header Tags setting is one of them. It’ll be beneficial for you to use custom robots headers tags correctly. It’s easy to manage these settings.

#2 Custom Robots.txt

Search engine bots like Googlebot (Web Crawling Robot of Google) needs some guidelines on how they have to crawl and index our blog. We can prevent some non-important pages labels pages from indexing in Google to protect our blog from duplicate content issues. Read this article to add custom robots.txt file in blogger.

#3 Optimize Blog Post Titles

If you just started your blog on blogger’s default template, then definitely you’ll not be aware with this fact that your post titles are not properly optimized for search engines. You need to do some editing in your blog template to make your post titles properly optimized. You will see a noticeable change in organic traffic of your blog after making this change.

#4 Image Optimization

You may definitely notice relevant images between the posts on many blogs. Images not only enhance the look of our content, but it also plays an important role to optimize our blog posts. If we make effective use of images in our blog posts, then we can attain extra traffic from search engines.
Read this ultimate image optimization guide.

#5 Internal Linking SEO

Many bloggers fail to optimize their internal links or even they don’t link their posts to each other internally. This is really a big mistake that we must avoid. Internal linking not only increases our blog page views but also help our posts to rank well in search engines. If you are also doing the same mistake, then you must need some tips to optimize your internal links.

#6 Search Engine Submission

When we are ready with our blog optimization, then we need to submit our blog in Google’s webmaster tool. Verifying and submitting our blog in Google webmaster tool helps it to get indexed in Google super fast. It also tells about our blog issues like broken links, HTML improvements etc that we must try to resolve. We just need to verify our blog ownership and submit a sitemap. That’s it. If you have not added your blog GWT, then I recommend you to read below tutorial.

#7 Improve Your Blog Load Time

If your blog takes lot of time, then visitors will go back and never come back again. It will increase bounce rate of your blog and you’ll lose your valuable traffic. Search engines give more value to fast loading blogs because they want to build best user experience. That’s why it’s very important to optimize blog loading time. I have shared some best tips that can help you to enhance your blog’s loading speed.

Saturday, 18 February 2017

How To Add Contact Form (Contact Us Page) in Blogger

How To Add Contact Form (Contact Us Page) in Blogger

How To Add Contact Form (Contact Us Page) in Blogger?

Adding a contact us form in Blogger is a tedious task as it does not support plugins like WordPress.
What most of the Blogspot bloggers does is to seek the help of third-party sites (foxyform, jotform, 123contactform, etc.).
Blogger Contact Form Page
But today, you are going to learn how to add official contact us page in Blogger.
  • How To Create Privacy Policy Page for Blogger?
As I said earlier, it is possible to get third-party codes to be inserted in new pages like a walk in the park. Yet, the official contact form is far better than those.

The Benefits of Official Blogger Form

  1. You will get the message as soon as one sends it. And, the deliverability is 100% as well.
  2. The simple interface makes it easy for the visitors to contact you.
  3. If you know Cascade Style Sheet (CSS) language, it will be easy for you to customize the form as per your liking.
  4. The entire page will not get reloaded for sending the message.
I have divided this tutorial into three sections, adding the contact gadget, hiding it and implementing the official code in a new page.

Part – 1: Adding the Contact Gadget

Follow the steps given below to add a contact us gadget on your blog.
Step 1: Visit blogger.com and log in to your account. If you are running multiple blogs, you need to choose the desired blog from the list.
Step 2: Click on Layout from the left sidebar to get an option to add gadgets.
blogger layout option

Step 3: You can see an Add a Gadget link on the main panel on the right side. Clicking on it will bring you to a list of gadgets.

blogger add a gadget

Step 4: Then, choose More gadgets from the left side. Now, you will see Contact Form. Just add the same.

Contact Form Gadget Blogger


Part – 2: Hiding the Gadget

Now, you are going to learn how to hide the contact gadget.
Step 1: We need to play with the template section here. So, click on Templates from the left menu.

Blogger Template Settings

Step 2: Then, click on Edit HTML and you will be provided with the whole code of your blog in a large field.

Blogger Template Edit HTML

Step 3: Search for ]]></b:skin> and place the following code just before it.
div#ContactForm1 {
display: none !important;
}


Contact Form Code Blogger

Then, click Save to retain the changes.
After the third step, you will not see Contact widget on your blog.

Part – 3: Adding Contact Form to a Page

You will get the customized official blogger contact form code here to be added to be shown on a separate page.
Step 1: Go to Pages and click on New page.

New Page in Blogger

Step 2: Paste the following code into the HTML post editor after removing everything in it.

Blogger Contact Us Page Code
<div id="custom_ContactForm1" class="widget ContactForm">
<div class="contact-form-widget">
<p>Get in touch with us by filling out the form below.</p>
<div class="form">
<form name="contact-form">
<p></p>
Name
<br>
<input type="text" value="" size="30" name="name" id="ContactForm1_contact-form-name" class="contact-form-name">
<p></p>
Email
<span style="font-weight: bolder;">*</span>
<br>
<input type="text" value="" size="30" name="email" id="ContactForm1_contact-form-email" class="contact-form-email">
<p></p>
Message
<span style="font-weight: bolder;">*</span>
<br>
<textarea rows="5" name="email-message" id="ContactForm1_contact-form-email-message" cols="25" class="contact-form-email-message"></textarea>
<p></p>
<input type="button" value="Send" id="ContactForm1_contact-form-submit" class="contact-form-button contact-form-button-submit">
<p></p>
<div style="text-align: center; max-width: 222px; width: 100%">
<p id="ContactForm1_contact-form-error-message" class="contact-form-error-message"></p>
<p id="ContactForm1_contact-form-success-message" class="contact-form-success-message"></p>
</div>
</form>
</div>
</div>
<div class="clear"></div>
<span class="widget-item-control">
<span class="item-control blog-admin">
<a title="Edit" target="configContactForm1" onclick="return _WidgetManager._PopupConfig(document.getElementById("ContactForm1"));" href="//www.blogger.com/rearrange?blogID=8799058979810298021&widgetType=ContactForm&widgetId=ContactForm1&action=editWidget&sectionId=sidebar-right-1" class="quickedit">
<img width="18" height="18" src="//img1.blogblog.com/img/icon18_wrench_allbkg.png" alt="">
</a>
</span>
</span>
<div class="clear"></div>
</div>

Step 3: Add a title (like Contact Us) and then change the settings given right as given below.

Contact Us Page Blogger


Step 4: Finally, click the Publish button. That’s all.

Monday, 13 February 2017

Bless My Home by Enkay

Bless My Home by Enkay


Verse 1
Lovely wedding plenty people and good food
Soon after a honeymoon in Dubai
After all the friends and well-wishers are gone
You have begun to build a new home
Many dreams, hopes and aspirations
As you turn this new page of your lives
You should ask for help from almighty creator
And tell him to bless our home
Keep us together

Chorus
Papa God bless my home
Etewo adura se se (stretch out your hands for prayer)
Bless my family
It’s a serious prayer
Etewo adura

Verse 2
Newly married plenty congratulations
Hope you know that you have a lot to do
No more ‘me, myself and I’ in this game
If not you will plan and fail
But God forbid o
Do you want a home that’s free from hate and strife?
Do you want a home that filled with warmth and peace?
You should ask for help from almighty prince of peace
And ask him to bless your home
Give you his blessings

Chorus
Papa God bless my home
Mo ni etewo adura (stretch out your hands for prayer)
O it’s a serious matter
No more divorces and separations and broken homes
Etewo adura se (stretch out your hands for prayer)
Father bless my home
I need your blessing baba baba
You have to mean this prayer

Bridge
I be prophet of God
Anything wey I talk dey happen
Anything wey you want from God
If I call am make you say amen
You go born man
You go born woman
Shey na ibeji (twins) you want o
God go give you
Iberin (quadruplets) you want o?
Idikwa sure e (are you sure?)
You go born iberin (quadruplets)
If na him you want o
Cos he who finds a wife has found a good thing
And favor from the Lord
Make you say amen.

Fire in my Bones by Hassel

Fire in my Bones by Hassel


Verse
There’s fire in my bones
I have got the victory coz God is on the throne
Tell the world that this message can heal and save: that I’m free and no longer a slave
This is something you should know about
How Christ died and eternal life did come about
Grace and peace is multiplied when you down on your knees
Growing in revelations: so take it to the nations
Tell’em you got Christ within: you free from sin
Tell’em that he he took the blame for you he came
All you gotta do is just believe
Go into the world preach, there’s no place the gospel cannot reach
I have been called, you have been called
Light is not meant to be hidden
The mystery that was hid now is shown: to you in the face of Christ
And God reveals his will at no cost or price coz Christ paid
We enter into his presence freely, I’m gonna let the world know this.

Chorus
There’s fire in my bones
Fire in my bones
I won’t stop speaking coz
Fire in my bones
For in my bones
For in my bones
I won’t stop speaking coz there’s fire in my bones aaahh (2ce)

Verse 2
The gospel is, nothing but the glory of one man
Christ he came down to the crowd
Became like us that  he could be faithful
As an high priest: my sins he washed by the blood
His death, burial, resurrection, what the law couldn’t do
He brought perfection: being the end of the law
Eternal life has come to us
He made us holy and blameless
Named us the sons
Spirit within us, made in his image
Translated to light, we are saved by his life
We are seated with Christ, let the world realise this
Life is a person
Live is his nature
How could he hate you
Seeing that Jesus was clearly crucified for your sins
Now you have to answer for the sins that were paid for
Life that he gives you is free to receive
So nothing can compare to being born from above
To being raised up to heaven, being one with the father
How could I not speak about this you

Repeat Chorus

Recital
And if I decide this day
Not to speak of him or mention his name
His word in my heart
Will be like fire shut up in my bones
I just can’t contain it
For I as unashamed is the gospel of Christ
For it is the power of God unto the salvation of everyone that believes
This is the commandment that he has given us
That he has made us a light amongst the people
That we should bring salvation to the ends of the earth
You know a lamp is not lit and places under
But instead it is placed on a lamp stand that it should
Show the light to everyone that is in the room
Now this is the calling that we have received
This is the awesome life that we have and we have the responsibility
To make every single person come into the knowledge of this
Now I cannot contain this
I cannot keep shut
This is the mandate
That I stand for
Glory to Jesus

You Are Wonderful by Onos ft. Preye Odede

You Are Wonderful by Onos ft. Preye Odede


You are wonderful
You are merciful
You are so faithful to me
You are wonderful
You are merciful
You are so faithful to me

Verse 2
My God keeps opening doors
Making a way, shinning  His light
In the darkness
My God keeps lifting my life
Blessing my home
Oh God I will praise you forever more
Whom Jesus Lifts
No one can bring him down
I decree promotion everywhere
Increase in your life
This year(3x)
The glory of God is revealed all over you
If you believe lift your voice and say

Our Blog

55 Cups
Average weekly coffee drank
9000 Lines
Average weekly lines of code
400 Customers
Average yearly happy clients

Our Team

Tim Malkovic
CEO
David Bell
Creative Designer
Eve Stinger
Sales Manager
Will Peters
Developer

Contact

Talk to us

Lorem ipsum dolor sit amet, consectetur adipisicing elit. Dolores iusto fugit esse soluta quae debitis quibusdam harum voluptatem, maxime, aliquam sequi. Tempora ipsum magni unde velit corporis fuga, necessitatibus blanditiis.

Address:

9983 City name, Street name, 232 Apartment C

Work Time:

Monday - Friday from 9am to 5pm

Phone:

595 12 34 567

featured Slider

?max-results="+numposts1+"&orderby=published&alt=json-in-script&callback=bthemez_slider\"><\/script>");

Follow us

Need our help to upload or customize this blogger template? Contact me with details about the theme customization you need.

Instagram